In today’s demanding business environment, clear communication is paramount. A key element often overlooked in this context is your status availability. It signifies whether you’re available for a meeting or too swamped to accept any new commitments. One popular tool millions use worldwide is Microsoft Outlook – renowned for its robust email, calendar, and task management features. One essential function many may find useful is the ability to change their status – today’s post will guide you through exactly that: how to change your status on Outlook and provide insights into some powerful scheduling tools that can make managing tasks more straightforward than ever before.
Why is Changing Your Status Important?
Before we dive into the steps, let’s discuss why it’s crucial:
- Professionalism: Regularly updating your status conveys a sense of professionalism. It shows you are conscious of your work schedule and respectful of others’ time.
- Improved Collaboration: By setting your status, colleagues know when it’s best to reach out, fostering seamless communication.
- Efficiency: Knowing when someone is busy or free can prevent unnecessary back-and-forths, streamlining workflows.
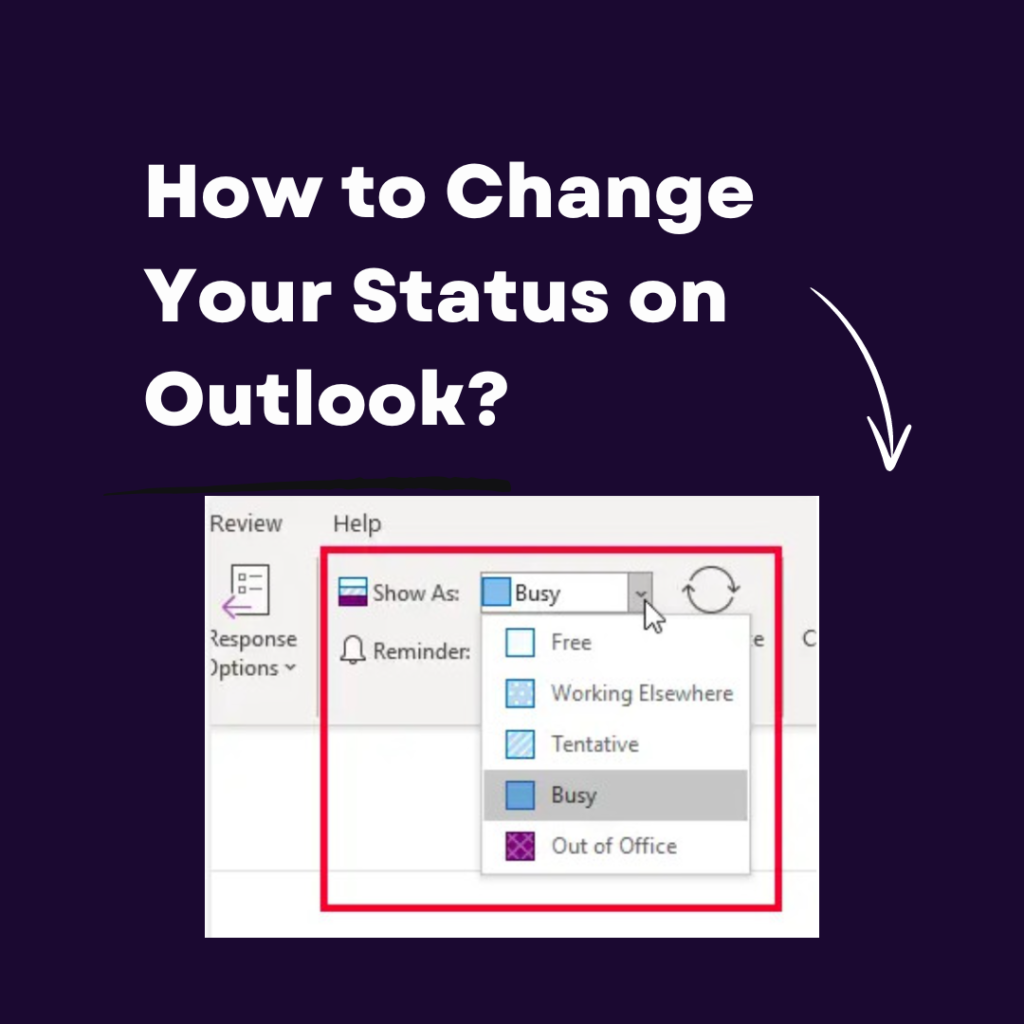
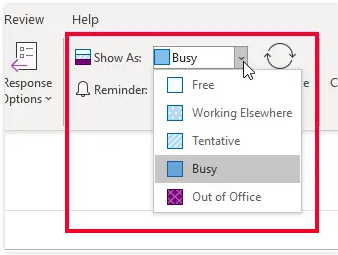
Understanding Outlook’s Status Options
Outlook offers a range of status options, each with its own significance:
- Available: You’re online and available to communicate.
- Busy: Engaged with another activity and might not respond immediately.
- Do Not Disturb: Prefer not to be contacted.
- Be Right Back: Temporarily away from your desk.
- Away: You’re offline or haven’t been active for a while.
Now, let’s get into the nitty-gritty of changing your status.
How to Change Your Status on Outlook: Step-by-Step
1. Via the Outlook Desktop Application:
- Step 1: Launch your Outlook desktop application.
- Step 2: Navigate to the bottom of your email or calendar window. You’ll see your current status icon.
- Step 3: Click on the status icon. A drop-down menu will appear.
- Step 4: Select your desired status from the menu.
2. Via Outlook on the Web (Outlook.com or Outlook Office 365):
Remember, the web version might have some interface differences based on updates and versions. As of my last update, follow these steps:
- Step 1: Log in to your account.
- Step 2: On the top-right corner, locate your profile picture or initials.
- Step 3: Click on the picture or initials.
- Step 4: A drop-down menu will appear. Choose the desired status.
3. Via Outlook Mobile App:
With the growing reliance on mobile devices, here’s how you can change your status on the go:
- Step 1: Open the Outlook app on your mobile device.
- Step 2: Tap on your profile icon or picture.
- Step 3: Tap on ‘Set Status.’
- Step 4: Choose from the available options.
Tips for Effectively Using Your Outlook Status
- Be Consistent: Update your status regularly. If you’re stepping out for a lunch break, set it to ‘Be Right Back.’
- Integrate with Calendar: Allow Outlook to auto-set your status based on your calendar. If you have a meeting, it can automatically change your status to ‘Busy’.
- Use Custom Status Messages: If the predefined status messages don’t fit your situation, you can sometimes add a custom message. This feature is especially useful for providing additional context.
- Meeting Invitations with Video Introductions: When scheduling a meeting through Outlook, include a Weezly video introduction to give invitees a quick overview of the agenda or your expectations. This enhances the clarity and professionalism of your meetings.
How to Change Your Status on Outlook: Conclusion
Changing your status in Outlook is more than just a technical step – it’s a professional courtesy. It’s an easy yet powerful way to streamline communication within a team. Embrace this feature, and you’ll find the benefits quickly stack up. Whether you’re a regular Outlook user or someone just getting started, knowing this simple trick can have a significant impact on your day-to-day communications.